Many of my prospective wedding couples are asking me about the new buzzword called “Available Light Photography” also known an “Natural Light Photography”. I don’t know where or when it originated, but it seems to be a popular technique because of it’s simplicity and advent of high ISO cameras. With available light technique, you just point and shoot and as long as the subjects are in good light, there is little if any concern for the background or foreground exposure. The available light technique is definitely popular with beginner photographers and with many seasoned pros. I have also used available light techniques in the past, especially with my fast lenses so I don’t want knock its practice entirely nor those that employ it, but I’ve seen many a photographer just shooting away in afternoon sunlight using no flash fill. There was one local photographer who actually tweeted that “…he chose to avoid flash at any cost!”. I am completely opposed to that point of view and I can’t tell you how many times I’ve been asked why I use an on camera or off-camera flash during my outdoor wedding portraits. I hope my explanation below makes it clear.
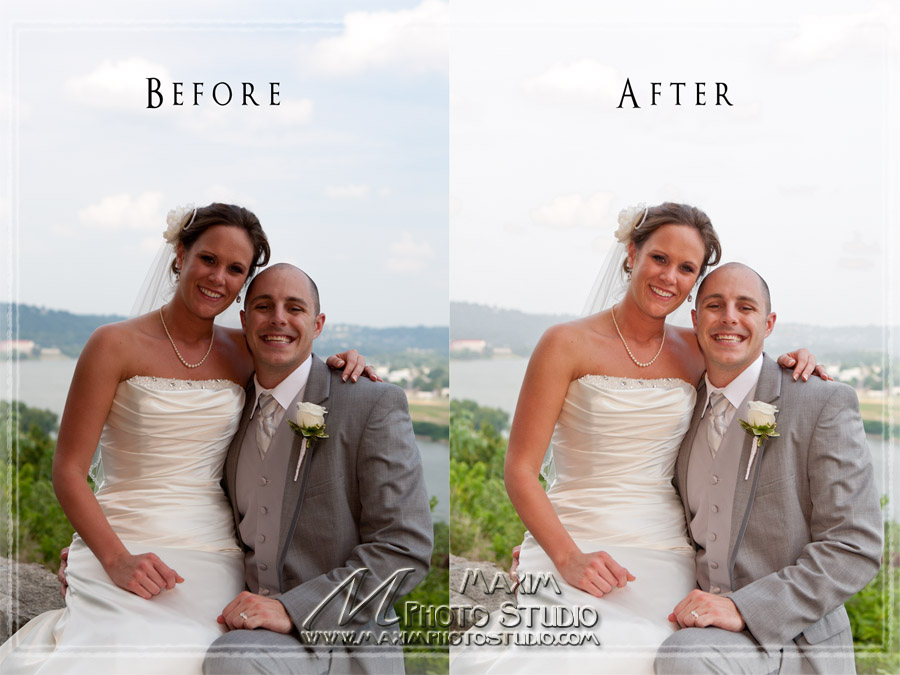
When I photograph my wedding portraits, I am looking for all my images to have a certain “pop”. This means that the foreground, middle ground (subject) and background are properly exposed. This is hard to do with available light, unless the subject and backgrounds are exposed by the same light. When the subject is in shadow as in the before image below, but the background is illuminated by sunlight, the resulting available light image results in “raccoon eyes”. When I adjust my compensation in the camera to lighten the subjects faces and eyes, I get a decent light on the face, but the eyes are still too dark for my taste and the background is now a dirty white mess. You could spend hours correcting such images in Photoshop or make sure that the image is correct in camera at the outset. Perhaps that is why I am able to post all of my wedding day images within a few days of the wedding where as others take weeks.
I always shoot my wedding portraits with a flash, whether as main or fill. To return to my example, the original picture is below on the left and my image using a flash as fill is on the right. You see how the image on the right practically jumps off of the page? Look at the difference in the eye sockets and the “pop” that I achieve. In the image on the right, I also added a CTO gel to my flash to add warmth to the skin tones and turn the blue sky to it’s natural color. I made no post-processing adjustments to color saturation or hue.
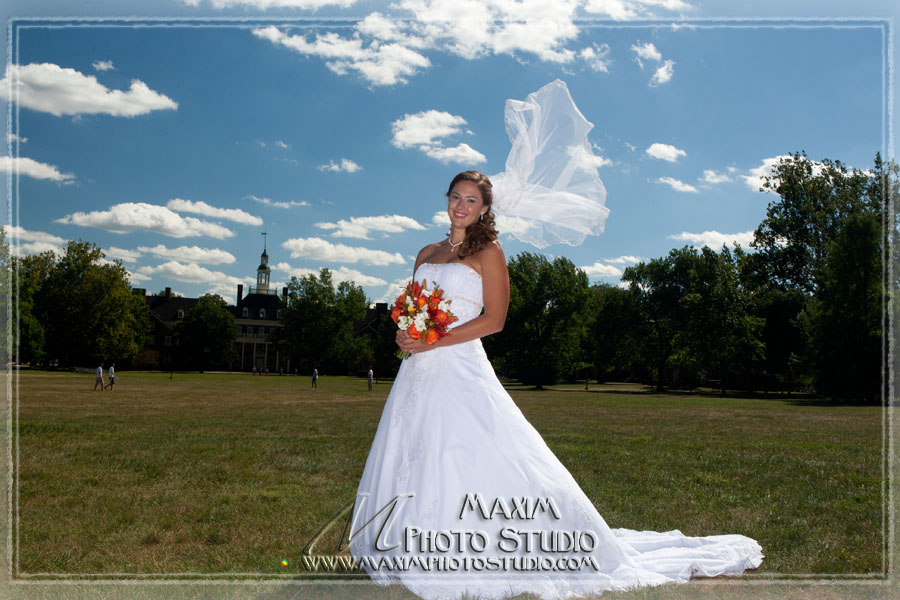
Another example of the image “pop” is this example from my recent Miami (OH) University wedding earlier this month. As I said, I want to make sure that I get the image right in the camera first, without having to rely on a lot of post-processing. Below is an actual image from the camera, I did not alter it in any way except for the border and logo. I love how Katie is separated from the background and the sky is vivid blue.


I would have to agree with Amanda. I think your photography is nice and I agree that flash fill is needed at times when the sun is not in great positions especially during a wedding ceremony where you cannot adjust according to the sun. But nothing can beat the perfect natural sunlight falling on eyes making them glossy and illuminating. If done correctly, you won’t need fill flash.
Amanda, these images may look strange, but they are far from unreal. In fact, I’ve made no adjustments to exposure, color hue or saturation and I can dial down the flash impact rather than adding it in post. I guess this is my way of separating myself from others’ styles.
I disagree. I feel like all of those afters look strange and unreal. Outdoor flash is odd.